
In this article, you will learn the simple steps to replace the wheels on your self-propelled lawn mower. Whether you’ve noticed some wear and tear or your wheels have completely given out, don’t worry! With our user-friendly guide, you’ll be able to tackle this task with ease and get your mower back up and running smoothly in no time. So, grab your tools and let’s embark on this DIY adventure together!
Checking the condition of the wheels
Inspecting the tires
Before replacing the wheels on your self-propelled lawn mower, it is essential to inspect the tires and assess their condition. Look for any signs of wear, such as uneven tread wear, cracks, or bulges. If you notice any of these issues, it is a good indication that the wheels need to be replaced. Additionally, check the tire pressure to ensure it matches the manufacturer’s recommended specifications.
Checking the wheel bearings
Another critical aspect to consider when replacing the wheels is checking the wheel bearings. Wheel bearings are responsible for allowing smooth rotation of the wheels. Check for any signs of damage or excessive play in the bearings. If there is any noticeable looseness or grinding noise, it may be necessary to replace the wheel bearings along with the wheels.
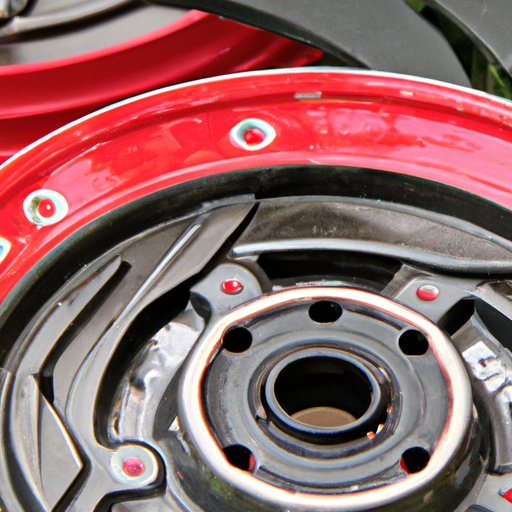
Examining the wheel rims
In addition to the tires and wheel bearings, it is important to examine the wheel rims for any signs of damage. Look for bends, cracks, or corrosion on the rims. These can negatively impact the performance and safety of your lawn mower. If you notice any damage, it is recommended to replace the wheel rims along with the wheels for optimal performance and longevity.
Gathering the necessary materials and tools
Identifying the type and specifications of the wheels
Before purchasing replacement wheels, it is crucial to identify the type and specifications of the existing wheels on your self-propelled lawn mower. Measure the diameter and width of the wheels to ensure you select the correct size. Additionally, take note of the wheel mounting configuration, whether it uses studs, cotter pins, or another method. This information will help you choose the appropriate replacement wheels.
Purchasing replacement wheels
Once you have identified the type and specifications of your lawn mower’s wheels, it is time to purchase the replacement wheels. Visit a local garden or home improvement store, or you can also find a wide range of options online. Ensure that the replacement wheels you choose are suitable for your specific lawn mower model and that they meet the necessary specifications.
Collecting the required tools
Before starting the wheel replacement process, gather all the necessary tools to ensure a smooth and efficient procedure. Some common tools you might need include a socket wrench, pliers, jack stands, adjustable wrench, and a rubber mallet. Additionally, it is advisable to have some penetrating oil on hand to help loosen stubborn wheel nuts if needed. Double-check that you have all the required tools before proceeding with the replacement process.
Preparing the lawn mower for wheel replacement
Disconnecting the spark plug
Prior to any maintenance or repairs on your lawn mower, including wheel replacement, it is essential to disconnect the spark plug. This will prevent any accidental starts and ensure your safety throughout the procedure. Locate the spark plug wire and disconnect it from the spark plug itself. This simple step will help avoid any potential accidents during the wheel replacement process.
Securing the lawn mower
To prevent your lawn mower from tipping or moving while you work on the wheels, it is important to secure it properly. Find a flat and stable surface to park your lawn mower. If available, engage the parking brake to prevent unwanted movement. Additionally, you can place a block or wedge behind the wheels opposite to the ones you are replacing to provide extra stability and prevent any unintended rolling.
Removing debris and obstacles
Before removing the old wheels, it is wise to clear any debris or obstacles that may hamper the wheel replacement process. Check the area around the wheels and remove any grass clippings, rocks, or other debris that could interfere with your work. Make sure there are no potential hazards that could impede your progress or cause accidents during the replacement procedure.
Removing the old wheels
Raising the mower to a comfortable working height
To access the wheels easily, you will need to raise the lawn mower to a comfortable working height. The exact method for raising the mower may vary depending on your specific model. Some mowers have a built-in jack or lifting mechanism, while others may require the use of a separate jack or blocks. Refer to your lawn mower’s user manual for instructions on safely raising the mower.
Removing the wheel caps
Once the mower is at a suitable working height, locate the wheel caps on the old wheels. Wheel caps are usually found on the center of the wheel and can be removed by prying them off carefully using a screwdriver or a similar tool. Gently insert the tool under the edge of the wheel cap and apply gentle pressure to pop it off. Set the wheel caps aside in a safe place, as you will need them later when installing the new wheels.
Loosening and removing the wheel nuts
After removing the wheel caps, you will be able to access the wheel nuts that secure the wheels to the axle. Use an appropriate sized socket wrench or an adjustable wrench to loosen and remove the wheel nuts. Turn the wrench counterclockwise to loosen the nuts. If the nuts are tight and difficult to loosen, you can apply some penetrating oil to help loosen them. Once the nuts are loosened, remove them completely along with any additional washers or spacers.
Installing the new wheels
Attaching the replacement wheels
With the old wheels removed, it is time to install the new wheels. Take each replacement wheel and align it with the wheel hub on the axle. Slide the wheel onto the axle, making sure it fits snugly and rests securely against the wheel hub. Ensure that all the mounting holes on the wheel align with the holes on the axle. If necessary, rotate the wheel slightly to achieve proper alignment.
Tightening the wheel nuts
Once the replacement wheels are properly aligned, it is crucial to tighten the wheel nuts securely. This will ensure that the wheels remain firmly attached during operation. Use the socket wrench or adjustable wrench to tighten the wheel nuts. Turn the wrench clockwise to tighten the nuts, applying enough torque to ensure a tight fit. Make sure not to overtighten the nuts, as this can damage the wheel or axle threads.
Replacing the wheel caps
After the wheel nuts are securely tightened, it is time to replace the wheel caps. Take the previously removed wheel caps and align them with the center of the replacement wheels. Gently press them into place, ensuring they are firmly seated and flush with the wheel surface. The wheel caps provide a finished look and help protect the wheel nuts from dirt and moisture.
Adjusting the wheel height
Determining the desired cutting height
Before adjusting the wheel height, it is important to determine the desired cutting height for your lawn mower. Different lawn conditions and personal preferences may require varying cutting heights. Refer to your lawn mower’s user manual or consult a professional to determine the appropriate cutting height for your specific needs.
Adjusting the wheel height settings
Most self-propelled lawn mowers come with adjustable wheel height settings that allow you to customize the cutting height. Locate the wheel height adjustment levers or knobs, typically located near each wheel. Adjust the levers or knobs to the desired cutting height setting, ensuring that all wheels are set to the same height for even cutting. Once the adjustment is made, make sure the levers or knobs are securely locked in place to prevent any unwanted changes while mowing.
Ensuring even cutting
After adjusting the wheel height, it is important to verify that the cutting height is even across all wheels. Measure the distance between the blade and the ground at various points around the mower. If you notice any significant variations, readjust the wheel height settings accordingly. Achieving an even cutting height will result in a more uniform and aesthetically pleasing lawn.
Testing the new wheels
Lowering the lawn mower
With the new wheels installed and the wheel height adjusted, it is time to lower the lawn mower back to the ground. Carefully release any jacks or lifting mechanisms, ensuring that the lawn mower is stable and secure. Slowly lower the mower until all wheels rest firmly on the ground. Properly lowering the lawn mower is crucial for its stability and overall performance.
Reconnecting the spark plug
Once the lawn mower is back on the ground, it is important to reconnect the spark plug. Locate the spark plug wire and carefully attach it to the spark plug. Ensure it is securely connected to prevent any accidental starts and ensure a safe working environment.
Testing the mower’s maneuverability
To ensure that the new wheels are functioning correctly and that the mower is maneuverable, take it for a test run. Start the engine and operate the lawn mower, paying attention to its overall maneuverability. Check if the mower moves smoothly and turns easily in different directions. If any issues are detected, such as excessive vibration or difficulty in maneuvering, reevaluate the wheel installation and adjust as necessary.
Maintaining the new wheels
Regularly cleaning the wheels
To prolong the lifespan and ensure optimal performance of your new wheels, it is important to regularly clean them. After each mowing session, remove any grass clippings, dirt, or debris that may have accumulated on the wheels. Use a brush or a damp cloth to gently wipe the wheels clean. Avoid using harsh chemicals or abrasive materials that can damage the wheel surface.
Inspecting and lubricating the wheel bearings
Periodically inspect the wheel bearings to ensure they are in good condition. Look for any signs of wear or damage, such as rust or excessive play. If necessary, lubricate the wheel bearings with a suitable lubricant to maintain smooth and efficient rotation. Refer to your lawn mower’s user manual for guidance on the appropriate lubricant and maintenance schedule for the wheel bearings.
Replacing worn-out wheels as needed
Over time, even the best-maintained wheels will inevitably wear out. Regularly inspect the condition of your lawn mower’s wheels and replace them as needed. If you notice significant tread wear, cracks, or other signs of deterioration, it is a clear indication that the wheels need to be replaced. Promptly replacing worn-out wheels will help ensure the safe and effective operation of your self-propelled lawn mower.
Safety precautions
Using protective gloves and eyewear
When working on your lawn mower, it is essential to prioritize your safety by wearing appropriate protective gear. Make sure to wear protective gloves to safeguard your hands from sharp edges and moving parts. Additionally, wearing safety eyewear will protect your eyes from debris or any potential hazards that may arise during the wheel replacement process.
Disabling the lawn mower’s engine
Before starting any maintenance or repair work, always disable the lawn mower’s engine. This can be done by disconnecting the spark plug wire, as mentioned earlier. Disabling the engine will prevent any accidental starts that could lead to serious injuries during the wheel replacement process.
Working in a well-ventilated area
During the wheel replacement process, it is important to work in a well-ventilated area to avoid inhalation of exhaust fumes or other potentially harmful substances. If you are working indoors or in an enclosed space, ensure that there is proper ventilation to minimize the risks associated with prolonged exposure to exhaust gases. If possible, perform the wheel replacement outdoors to ensure optimal ventilation and fresh air circulation.
Troubleshooting common issues
Uneven cutting after wheel replacement
If you notice uneven cutting patterns after replacing the wheels, it may indicate an issue with the wheel height adjustment. Double-check the wheel height settings and ensure that all wheels are set to the same level. Make the necessary adjustments until the cutting height is even across all wheels. If the problem persists, consult a professional or refer to the lawn mower’s user manual for further troubleshooting steps.
Difficulty in removing the wheel nuts
Occasionally, you may encounter difficulty in removing the wheel nuts during the wheel replacement process. If the nuts are stuck or difficult to loosen, apply a suitable penetrating oil to the threads. Allow the oil to penetrate the threads for a few minutes, and then attempt to loosen the nuts again. If the nuts are still stubborn, seek professional assistance to avoid damaging the wheels or the mower’s axle.
Wheels not fitting properly
In some cases, the replacement wheels may not fit properly on the axle despite matching the specifications. If you encounter this issue, double-check that you have selected the correct size and type of wheels for your lawn mower model. Consult the manufacturer’s guidelines or seek professional advice to ensure you have the right wheels. Using improperly sized or incompatible wheels can affect the performance and safety of your lawn mower.